
The Cloudflow development process
To understand the value that Cloudflow offers, let’s break down the typical develop-test-package-deploy lifecycle of an application and see how Cloudflow helps at each stage to accelerate the end-to-end process.
When creating streaming applications, a large portion of the development effort goes into the mechanics of streaming. These include configuring and setting up connections to the messaging system, serializing and deserializing messages, setting up fault-recovery storage, and more. All of these mechanics must be addressed before you can finally add the most important and valuable part—business logic.
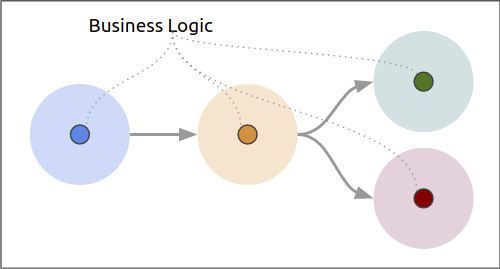
Cloudflow introduces a new component model, called Streamlets. The Streamlet model offers an abstraction to:
-
Identify the connections of a component as inlets and outlets, relieving you from setting up connections.
-
Attach the schema of the data for each connection, providing type safety at compile time, automatic serialization/deserialization, and avoiding potentially critical issues at deployment.
-
Provide an entry point for the business logic of the component, allowing you to focus on coding the most valuable business-specific logic.
Develop focusing on your business logic
Cloudflow currently includes backend Streamlet implementations for Akka Streams, Apache Spark Structured Streaming, and Apache Flink. Using these implementations you can write business logic in the native API of the backend, using either Java or Scala for the Akka Streams and Apache Flink Streamlet implementations or Scala for the Apache Spark Structured Streaming implementation. Additionally, Cloudflow can be extended with new streaming backends.
|
Apache Spark Structured Streaming is currently offered only in Scala. |
Let’s take a look at the parts of a Streamlet in the following example:
class MovingAverageSparklet extends SparkStreamlet { (1)

  val in    = AvroInlet[Data]("in")
  val out   = AvroOutlet[Data]("out", _.key)
  val shape = StreamletShape(in, out) (2)

  override def createLogic() = new SparkStreamletLogic {
    override def buildStreamingQueries = { (3)

      val groupedData = readStream(in) (4)
        .withColumn("ts", $"timestamp".cast(TimestampType))
        .withWatermark("ts", "1 minutes")
        .groupBy(window($"ts", "1 minute", "30 seconds"), $"key")
        .agg(avg($"value").as("avg"))
      val query = groupedData.select($"key", $"avg".as("value")).as[Data]

      writeStream(query, out, OutputMode.Append).toQueryExecution
    }
  }
}| 1 | SparkStreamlet is the base class that defines Streamlet for the Apache Spark backend. |
| 2 | The StreamletShape defines the inlet(s) and outlet(s) of the Streamlet, each inlet/outlet is declared with its corresponding data type. |
| 3 | buildStreamletQueries is the entry point for the Streamlet logic. |
| 4 | The code provided is written in pure Spark Structured Streaming code, minus the boilerplate to create sessions, connections, checkpoints, etc. |
Akka Streams and Flink-based Streamlets follow the same pattern.
Compose application flow with a blueprint
Once you have developed components as Streamlets, you compose the application’s end-to-end flow by creating a blueprint. The blueprint declares the streamlet instances that belong to an application and how each streamlet instance connects to the others.
The following example shows a simple Blueprint definition:
blueprint exampleblueprint {
streamlets { (1)
ingress = sensors.SparkRandomGenDataIngress
process = sensors.MovingAverageSparklet
egress = sensors.SparkConsoleEgress
}
connections { (2)
ingress.out = [process.in]
process.out = [egress.in]
}
}| 1 | streamlets section: declares instances from the streamlets available in the application (or its dependencies). |
| 2 | connections section: declares how the inlets/outlets of a streamlet should be connected. |
Note that the declaration of instances in the streamlets section supports component reuse by letting you define multiple instances of a streamlet, with potentially different configurations. With the blueprint file in place, you can verify whether all components in the application are properly connected.
The verifyBlueprint function, is part of the sbt-cloudflow plugin. The following shows example output from running sbt verifyBlueprint:
$ sbt verifyBlueprint
[info] Loading settings for project global-plugins from plugins.sbt ...
[info] Loading global plugins from /home/maasg/.sbt/1.0/plugins
[info] Loading settings for project spark-sensors-build from cloudflow-plugins.sbt,plugins.sbt ...
[info] Loading project definition from cloudflow/examples/spark-sensors/project
[info] Loading settings for project sparkSensors from build.sbt ...
[info] Set current project to spark-sensors (in build file:cloudflow/examples/spark-sensors/)
[info] Streamlet 'sensors.MovingAverageSparklet' found
[info] Streamlet 'sensors.SparkConsoleEgress' found
[info] Streamlet 'sensors.SparkRandomGenDataIngress' found
[success] /cloudflow/examples/spark-sensors/src/main/blueprint/blueprint.conf verified.
The verification uses the schema information provided by the blueprint to check that all connections between streamlets are compatible. Once the blueprint verification succeeds, you know that the components of your streaming application can talk to each other. After verification, you can run the complete application.
Test using the local Sandbox
Cloudflow comes with a local execution mode called sandbox. The sandbox instantiates all streamlets of an application’s blueprint with their connections in a single, local JVM.
See the sandbox in action in the following screencast.
The sandbox provides you with a minimalistic operational version of the complete application. Use it to exercise the functionality of the application end-to-end and verify that it behaves as expected. You get a blazing fast feedback loop for the functionality you are developing—removing the need to go through the full package, deploy, and launch process on a remote cluster.
Package using build-generated artifacts
Once you are confident that the application functions as expected, you can build a package. Cloudflow applications are packaged as a single docker image that contains the necessary dependencies to run the different streamlets on their respective backends. That image gets published to a docker repository of your choice.
Deploy with kubectl extensions for a YAML-less experience
After testing and packaging, you are ready to deploy the application to a Cloudflow-enabled Kubernetes cluster. In contrast with the usual YAML-full experience that typical K8s deployments require, Cloudflow uses the blueprint information and the streamlet definitions to auto-generate an application deployment.
Cloudflow also comes with a kubectl plugin that augments the capabilities of your local kubectl installation to work with Cloudflow applications.
You use your usual kubectl commands to auth against your target cluster. Then, with the kubectl cloudflow plugin you can deploy and manage a Cloudflow application as a single logical unit.
$ kubectl cloudflow deploy docker-registry/app-image:versionThis method is not only dev-friendly, but is also compatible with the typical CI/CD deployments. This allows you to take the application from dev to production in a controlled way.
Conclusion
As a developer, Cloudflow gives you a set of powerful tools to accelerate the application development process:
-
The Streamlet API let’s you focus on business value and use your knowledge of widely popular streaming runtimes, like Akka Streams, Apache Spark Structured Streaming, and Apache Flink to create full-fledged streaming applications.
-
The blueprint lets you easily compose your application with the peace of mind that a verification phase, informed by schema definitions, provides.
-
The Sandbox lets you exercise the complete application in seconds, giving you a real-time feedback loop to speed up the debugging and validation phases.
And with a fully developed application, the kubectl cloudflow plugin gives you the ability to deploy and control the lifecycle of your application on an enabled K8s cluster.
Cloudflow takes away the pain of creating and deploying distributed applications on Kubernetes, speeds up your development process, and gives you full control over the operational deployment. In a nutshell, it gives you distributed application development super-powers on Kubernetes.