
Composing applications using blueprints
In Cloudflow, a streaming application is composed of connected Streamlets.
Each Streamlet defines zero or more inlets and outlets.
To create a working application, we must describe how the Streamlets connect together, using topics as communication channels.
A blueprint specifies the streamlets used in an application and how they are connected. In practical terms, a blueprint is a text file that uses the HOCON format to declare the streamlets in an application, the topics used as communication channels, and the connections between streamlets and topics.
The blueprint must be defined within the file structure of the Cloudflow application sbt project, in the file src/main/blueprint/blueprint.conf.
An example of a blueprint is shown below:
blueprint {
  streamlets {
    sensor-data = com.example.SensorDataIngress
    metrics = com.example.SensorDataToMetrics
    validation = com.example.MetricsValidation
    reporter = com.example.MetricsEgress
  }

  topics {
    sensor-data {
      producers = [sensor-data.out]
      consumers = [metrics.in]
    }
    metrics{
      producers = [metrics.out]
      consumers = [validation.in]
    }
    validated {
      producers = [validation.out-0]
      consumers = [reporter.in]
    }
  }
}| Blueprint files are specified in the HOCON format, a superset of JSON. |
The above example shows four streamlets, sensor-data, metrics, validation, and reporter.
The streamlets section declares the streamlets used in the application and gives them a short name.
The topics section declares topics and describes the connections between streamlets and topics.
Let’s review these sections in more detail.
The streamlets Section
In this section, we describe the streamlets used within the application.
Each streamlet declaration consists of <short-name> = <fully qualified implementation file> pairs.
Declaring streamlets in this way ensures two important conditions:
-
Only streamlets declared in this section will be used in the application, regardless of the available streamlets in the implementing project.
-
The same streamlet implementation class can be instantiated multiple times by declaring multiple streamlet names that point to the same implementation class.
You should view a Streamlet, implemented as a Java or Scala class, as a reusable component that can be used to create instances, not as a singleton object that will only run once.
| Using the configuration system, different streamlet instances of the same implementation can be given different configurations so that they can work in customized ways. |
Understanding the short-name
There are a few characteristics related to the streamlet name given with the short-name, as we list here:
-
The short name gives a name to a streamlet instance.
-
The implementation of that instance is indicated by the fully qualified name (FQN) of the streamlet implementation class.
-
Each short name must be unique within the application.
The short-name becomes part of the application in the following ways:
-
We use this name to refer to the streamlets in the topics section.
-
It becomes the name of the component in the application runtime (deployments or pods on a Kubernetes cluster)
The streamlets Section: An Example
Lets zoom in on the streamlets section in the example below:
  streamlets {
    sensor-data = com.example.SensorDataIngress
    metrics = com.example.SensorDataToMetrics
    validation = com.example.MetricsValidation
    reporter = com.example.MetricsEgress
  }
The above example shows four streamlet instances defined in the com.example package:
-
sensor-data -
metrics -
validation -
reporter
Streamlet classes are specified by their fully qualified names:
sensor-data = com.example.SensorDataIngressIt is possible to declare additional instances of any streamlet class. This would be a legal declaration:
valid-metric-reporter   = com.example.MetricsEgress
invalid-metric-reporter = com.example.MetricsEgress
Once deployed, Cloudflow will run at least one streamlet instance–depending on the requested number of replicas–for each streamlet reference that has been defined in the blueprint.
These classes must be available on the classpath, which can be defined directly in the Cloudflow application sbt project or in any dependency that the project has specified, as you would expect of any sbt project.
The streamlet references assigned in the streamlets section can be used in the topics section to connect streamlets and topics, as we explore in the next section.
The topics Section
In the topics section, we define the connections of an application.
Consumers and Producers
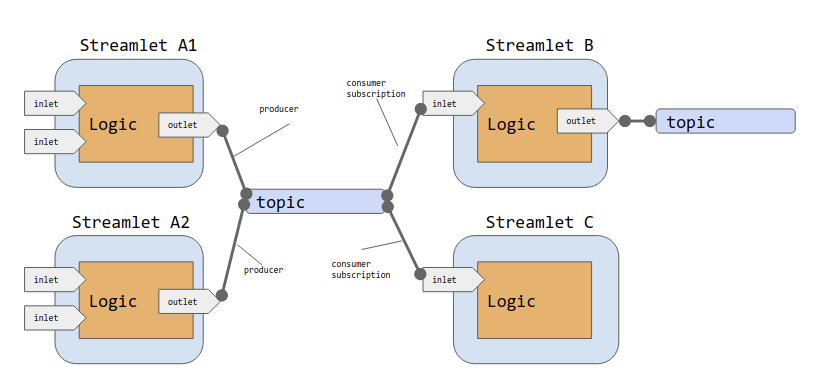
In the event-based model used by Cloudflow, inlets are stream consumers, and outlets are stream producers.
Consumers and producers do not connect point-to-point to each other. Instead, we use topics to provide a communication channel between producers and consumers. This model allows for organic growth of an application over time. Newly implemented processes, modeled as streamlets, can be added to an existing application by connecting them to the list of consumers at the appropriate place in the data flow.
We can see these connections in the following diagram.
Basic Declaration of Topics, Consumers, and Producers
In a blueprint definition, we define topics by adding a named configuration stanza to the topics section for each topic that we want to use.
Let’s consider the following generic definition:
my-topic-name {
  producers = [streamlet-a1.out, streamlet-a2.out]
  consumers = [streamlet-b.in]
}
We can appreciate in this snippet that:
-
The name of the configuration,
my-topic-name, corresponds to the name of the topic we want to define. -
producersis a list of zero or more streamlet outlets (data producers) -
consumersis a list of zero or more streamlet inlets (data consumers)
At deployment time, the Cloudflow operator will create a topic called my-topic-name on the Kafka broker managed by Cloudflow.
| The topic name is global to all applications deployed with Cloudflow on the same cluster. |
Named Kafka Clusters
All Cloudflow managed topics defined in a blueprint will use the default Kafka cluster defined during installation by default (unless inline Kafka connection info is provided as described in Advanced Topic Configuration).
If your application must integrate with other Kafka clusters then you can configure additional named Kafka clusters during install or upgrade of Cloudflow.
If a topic references a named cluster then any streamlet that’s connected to the topic will use the configuration of that named cluster (bootstrap.servers, Consumer, Producer, and common Kafka client connection properties).
In the following snippet, we tell Cloudflow to use the us-east named Kafka cluster for all streamlets that connect to the my-topic-name topic.
my-topic-name {
  producers = [streamlet-a1.out, streamlet-a2.out]
  consumers = [streamlet-b.in]
  cluster = us-east
}
For more information on setting up named Kafka clusters see the Default and named Kafka clusters section of the Installing Cloudflow docs.
Advanced Topic Configuration
In Basic Declaration of Topics, Consumers, and Producers, we saw how to declare a built-in topic in Cloudflow to connect two or more Streamlets.
It is possible to extend the topic definition with additional configuration parameters to connect to arbitrary Kafka topics, hosted locally, on a remote server, or even connect to a managed Cloud service. It is best to specify this in a separate configuration file, which can be provided with the kubectl cloudflow deploy command. See The Configuration Model for information about the configuration file format.
In the following snippet, we declare a three topics that connect to an external managed Kafka instance. (Note that the credentials are redacted for obvious reasons)
cloudflow {
  topics {
    rides = ${shared-config} {      (1)
      topic.name = "incoming-rides" (2)
      consumers = [...]
      producers = [...]
    }
    fares = ${shared-config} {
      topic.name = "incoming-fares"
      consumers = [...]
      producers = [...]
    }
  }
}
shared-config {                      (3)
  managed = no                       (4)
  connection-config = ${kafka-connection-config} (5)
  producer-config = {
    # more config can be added here from Kafka ProducerConfig (see org.apache.kafka.clients.producer.ProducerConfig)
  }
  consumer-config = {
    # more config can be added here from Kafka ConsumerConfig (see org.apache.kafka.clients.consumer.ConsumerConfig)
  }
}| 1 | Creates a topic definition by extending the shared-config with additional configuration. |
| 2 | Sets the topic name explicitly, using the topic.name configuration key. |
| 3 | Adds an arbitrary configuration section to the blueprint definition. |
| 4 | Sets the managed topic flag to false. |
| 5 | Sets connection details from the config section kafka-connection-config (see below), these settings get automatically added to both the producer-config and the consumer-config. |
In the snippet above, we are centralizing the common configuration for all topics in a shared-config configuration entry.
We then use the HOCON configuration extension syntax, as in ${shared-config} {...} to extend the common configuration with the specific values required for each topic definition.
Note that the topics configuration can be extended under the cloudflow.topics section, in the configuration file. The configuration you specify here overrides what is defined for the topics in the blueprint.
We are also using the explicit topic.name property instead of using the default name of the configuration object to override the names of the topics.
It is important to note the presence of the flag managed, which indicated whether Cloudflow should create the topic (managed=true (default)) or not (managed=false).
You can also provide topic configuration in the blueprint, under a blueprint.topics.<topid-id> section. It is recommended that you do not specify topic configuration in the blueprint that differs per deployment environment. Configuration files are a better solution for this, as shown in this section.
|
We can set up the Kafka provider configuration in a separate configuration file, like this:
kafka-provider.confkafka-connection-config {
bootstrap.servers="my-server.europe-west1.gcp.cloud:9092"
security.protocol="SASL_SSL"
sasl.jaas.config="org.apache.kafka.common.security.plain.PlainLoginModule required username=\"MYAPIKEY\" password=\"MyPassWord\";"
ssl.endpoint.identification.algorithm="https"
sasl.mechanism="PLAIN"
}Then, at deployment time, we provide our additional configuration file (kafka-provider.conf) to the deploy command.
kubectl cloudflow deploy -u _json_key --password-stdin \
    /path/to/examples/taxi-ride/target/taxi-ride-fare.json  --conf kafka-provider.conf
Blueprint Verification
As discussed earlier, inlets and outlets of streamlets are explicitly typed, i.e., they only handle data that conform to specific Avro schemas. Inlets and outlets can only be connected to a topic if their schemas are compatible.
Cloudflow provides a blueprint verification task as part of the sbt-cloudflow plugin.
You can explicitly verify if the blueprint connects all the streamlets correctly by using:
sbt verifyBlueprintThe blueprint is automatically verified when you use application-level targets, like buildApp and runLocal.
You can visualize your blueprint as a graph by using:
sbt printAppGraphThis task will print an ASCII graph to the console.
Or use:
sbt saveAppGraphWhich will save an ASCII graph to the appGraph.txt file under the target/visuals/blueprint folder of your Cloudflow project.
You can also override the appGraphSavePath setting key to provide a new path for the App Graph file to save.